Friday, January 11, 2019

Belajar Java dengan Netbean - 3 ( Komponen Dasar Java )

Untuk Pelajaran ke 3, kita belajar mengenal komponen dasar dari java dengan netbean
pengenalan fungsi dasar dari komponen
1. JTextfield, JLabel, dan JButton
    buat tampilan seperti dibawah 
     
    isikan sintax seperti dibawah :
    

    disini kita akan menampilkan isi dari jTextfield ke jLabel dan kita kasih warna merah
    lalu jalankan, maka kan hasilnya :


2.  jCombobox dan jList
     buat tampilan seperti dibawah :
  isikan sintax sesuai dengan gambar dibawah :
    

  lihat hasilnya :


3. jRadioButton1 dan jCheckBox1
    buat tampilan seperti dibawah :
     
   isikan sintax sesuai dengan gambar dibawah :
 

  lihat hasilnya :


4. jTable
    buat tampilan seperti dibawah :
    

    isikan sintax sesuai dengan gambar dibawah :
    

   lihat hasilnya :
   

Belajar Java dengan Netbean - 4 ( set dan get value componen )

Untuk Pelajaran ke 4, kita belajar untuk set dan get value, warna  dan event pada komponen dasar dari java dengan netbean, seperti mengisikan nilai pada JTextfield dan lainnya.

1. JTextfield dan JLabel
buat tampilan seperti dibawah :

lalu isikan code nya :

hasil :


1.1. JTextfield hanya angka saja yang bisa diinput dan  key enter
        tambahkan pada code dibawah :
           
    lalu jalankan, maka saat diketik pada JTextfiled hanya mau angka saja, dan kalau dienter akan keluar message

2. Menambahkan Value pada JComboBox dan JList ( event Select Value ) dan JButton ( event klik )
     
     catatan :
     *. untuk menambahkan value pada JComboBox dari nilia JTextfield saat klik JButton 
     *. Akan mengambil nilai JList saat dipilih, dan akan ditampilkan pada JLabel

      buat tampilan seperti dibawah :


     isikan code seperti dibawah :


     Hasil :


3. JTable
     mengambil nilai pada JTable ke JTextField dengan event JButton ( ActionPerformed )
     
      buat tampilan seperti dibawah :


     isikan code seperti dibawah :
     

     Hasil


Wednesday, January 9, 2019

Installing MS SQL Server di Linux Centos

On RHEL / CentOS:

1. Insert the following lines into /etc/yum.repos.d/sql-server.repo:
[packages-microsoft-com-mssql-server]
name=packages-microsoft-com-mssql-server
baseurl=https://packages.microsoft.com/rhel/7/mssql-server/
enabled=1
gpgcheck=1
gpgkey=https://packages.microsoft.com/keys/microsoft.asc
To install the MS SQL Server command-line tools, create /etc/yum.repos.d/msprod.repo with these contents:
[packages-microsoft-com-prod]
name=packages-microsoft-com-prod
baseurl=https://packages.microsoft.com/rhel/7/prod/
enabled=1
gpgcheck=1
gpgkey=https://packages.microsoft.com/keys/microsoft.asc
2. Then install the packages using yum package manager, as usual:
# yum install -y mssql-server mssql-tools
When the installation is complete, you will be reminded to run the configuration script (/opt/mssql/bin/sqlservr-setup) to accept the license terms, set the password for the SA user, and start the service. Additionally, you can choose to enable it to start automatically on boot.
3. Open port 1433/tcp on your firewall in order to allow external clients to communicate with the database server:
If you’re using firewalld:
# firewall-cmd --add-port=1433/tcp --permanent
# firewall-cmd --reload
Otherwise (using iptables):
# iptables -A INPUT -p tcp --dport 1433 -j ACCEPT
# iptables-save > /etc/sysconfig/iptables

On Ubuntu Server, do:

1. In order for Ubuntu to trust the packages from the MS SQL Server repositories, import the GPG keys:
$ sudo sh -c "curl https://packages.microsoft.com/keys/microsoft.asc | sudo apt-key add -"
2. Add the repositories to /etc/apt/sources.list.d/sql-server.list:
$ sudo sh -c "echo deb [arch=amd64] https://packages.microsoft.com/ubuntu/16.04/mssql-server xenial main > /etc/apt/sources.list.d/sql-server.list"
$ sudo sh -c "echo deb [arch=amd64] https://packages.microsoft.com/ubuntu/16.04/prod xenial main >> /etc/apt/sources.list.d/sql-server.list"
3. Resynchronize the package index files and update the core package and additional tools:
$ sudo apt-get update
$ sudo apt-get install mssql-server mssql-tools -y
4. Run the configuration script as in the previous case:
$ sudo /opt/mssql/bin/sqlservr-setup
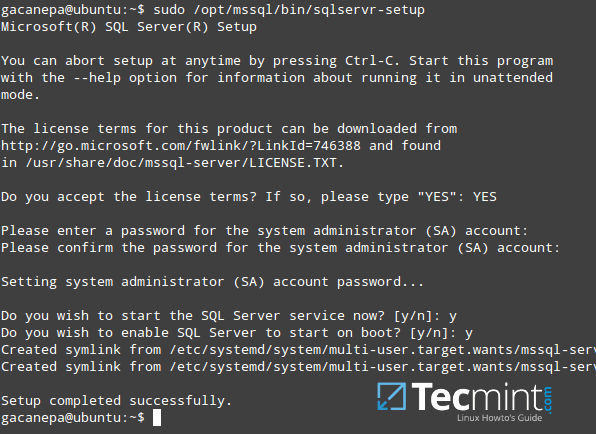
SQL Server Setup on Linux
5. Choose “Yes” when prompted to accept the license terms for MS SQL Tools:
Configuring MSSQL Tools on Linux

Testing MS SQL Server on Linux

We will login to the server and create a database named Fabrics. The -P switch must be followed by the password you chose when you installed the package previously:
$ sqlcmd -S localhost -U SA -P 'YourPasswordHere'
CREATE DATABASE Fabrics
exit
Create MSSQL Database on Linux
If you’re using Linux, you can continue using the command-line as shown above. Otherwise, install SQL Server Management Studio Express if you’re on Windows.
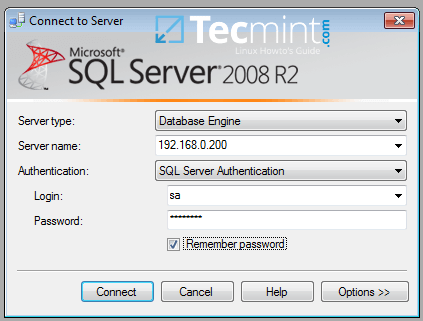
Once done, enter the IP of the database server (192.168.0.200in this case) and the login credentials (username=sapassword=YourPasswordHere):
Connect to MSSQL Server
Upon successful login, the Fabrics database should appear at the left hand side:
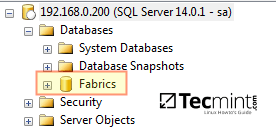
Confirm MSSQL Database
Next, click New Query to open a new query window where you’ll insert the contents of the Fabrics script from Codeproject.com, then click Execute.
If successful, you will see the script created 5 tables and the number of records in each:
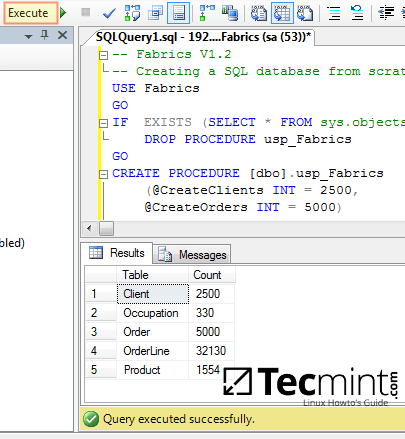
Create a Sample SQL Database
To wrap up, run the following query to retrieve the first 5 records from the Clients table:
USE Fabrics
SELECT TOP 5 FirstName, LastName,
DateOfBirth FROM Client
GO
The results should be identical to the output in the following image:
Run MSSQL Database Queries on Linux
Congratulations! You have successfully installed and tested MS SQL Server on Linux!

Install SQL Server Di linux Ubuntu

System requirements

Microsoft hasn’t stated the full system requirements to install SQL Server on Ubuntu, Red Hat, SUSE and Docker engine, the only thing they noted is that it requires more than 3.25GB of RAM. Listed below will be the basic minimum system hardware requirements to run Ubuntu, adjusted for the RAM and HDD space requirements to run SQL Server on Ubuntu:

CPU: 700Mhz processor (Intel Celeron or better)
RAM: 4GB minimum (Ubuntu needs 512MB at minimum)
HDD: 5GB for Ubuntu and additional 3GB for SQL Server at minimum 

Installation procedure

SQL Server on Linux currently supports a couple of distributions of Linux, those being Red Hat, SUSE and Ubuntu, as well as Docker engine.
For this article, we are going to install SQL Server on Ubuntu, the latest version being 17.04 at the time of writing this article.
  1. First, open Terminal by clicking right mouse click on desktop and selecting Open Terminal.
    Alternatively, you could go to start menu in the top left, opening it and clicking on Terminal to open it.
  2. After opening the Terminal, we are greeted with a window which looks like in the picture below.
  3. It is here where the installation takes place. First, we need to have the public repository’s GPG keys imported by entering the following command:
    curl https://packages.microsoft.com/keys/microsoft.asc | sudo apt-key add –
  4. The user needs to insert the account password before completing the step.
  5. After that, we need to have the Microsoft SQL Server’s Ubuntu repository registered. In this step as in previous, the user needs to enter the account password before completing the step (but only if 15 minutes from the last action have passed, as this is Ubuntu’s feature to only type the password only once in 15 minutes to make work flow easier).
    curl https://packages.microsoft.com/config/ubuntu/16.04/mssql-server.list | sudo tee /etc/apt/sources.list.d/mssql-server.list
  6. Now we can install SQL Server on Ubuntu by entering the following commands:
    sudo apt-get update
    sudo apt-get install -y mssql-server
    With this, the package is installed. To completely install SQL Server on Ubuntu we need to run the mssql-conf setup and follow the prompts. Also, a strong password is recommended for the creation of SA account (Minimum length of 8 characters, including both uppercase and lowercase letters and base 10 digits or/and non-alphanumeric symbols). To continue the setup run the following command:
    sudo /opt/mssql/bin/mssql-conf setup
  7. After the install of SQL Server on Ubuntu has been completed, we can check if the service is started and running by entering the following command:
    systemctl status mssql-server
  8. After some time, a software update may be released and that can be handled with a few lines in the Terminal. First, it is needed to update the apt-get repository lists by running the command below and entering the account password.
    sudo apt-get update
    sudo /opt/mssql/bin/mssql-conf setup
  9. After updating the repository lists, all that is needed to update the SQL Server is to run the above installation command which will update the mssql-server package:
    sudo apt-get install mssql-server
    Running these commands will try to download the latest package, afterwards replace the updated binaries which are located under /opt/mssql. No user-generated databases or system databases are affected with this operation.

Installation of SQL Server Tools

Optionally, users can install SQL Server Tools on Ubuntu to improve their experience. Currently, the package contains the Command line query utility (sqlcmd) and Bulk import export utility (bcp).
The installation is also done from the Terminal:
  1. First, it is needed to import the public repository’s GPG keys. After running this command, it is necessary to input the account password.
    curl https://packages.microsoft.com/keys/microsoft.asc | sudo apt-key add –
  2. After that it is needed to register the Microsoft Ubuntu repository:
    curl https://packages.microsoft.com/config/ubuntu/16.04/prod.list | sudo tee /etc/apt/sources.list.d/msprod.list
  3. Update the sources list and run the installation command with the unixODBC developer package:
    sudo apt-get update
    sudo apt-get install mssql-tools unixodbc-dev
  4. After running the second command, user will be prompted to allow the installation
  5. After which the user will need to Accept the license terms
  6. For the sqlcmd and bcp commands to be able to get accessed from bash shell, PATH needs to be modified in the ~/.bash_profile using the command:
    echo ‘export PATH=”$PATH:/opt/mssql-tools/bin”‘ >> ~/.bash_profile
    For non-login and interactive sessions, the PATH needs to be modified accordingly:
    echo ‘export PATH=”$PATH:/opt/mssql-tools/bin”‘ >> ~/.bashrc
    source ~/.bashrc
  7. After completing the installation, a test database is created to check the functionality of the SQL Server on Ubuntu.
  8. As the process completes, the latest SQL Server Management Studio installed on a Windows machine is started. Since the Ubuntu machine is in the local network, the IP address is 192.168.1.8. in this case. After connecting with SQL Server credentials (as Windows authentication doesn’t work in this case), it can be seen that the database we just created using sqlcmd tool in Linux Terminal is created and the server is reachable.

Installation of SQL Server Agent

In addition to SQL Server Tools, SQL Server Agent can also be installed as an addition after we install SQL Server on Ubuntu to manage and run scheduled jobs.
  1. Update the sources list and run the installation command, after which the Terminal will prompt to restart the SQL Server for the Agent to be able to start.
    sudo apt-get update
    sudo apt-get install mssql-server-agent
    sudo systemctl restart mssql-server
    After that, connecting to the server in SSMS shows up that the SQL Server Agent is running.

Troubleshooting

Problem
  • Cannot connect to the SQL Server on Ubuntu from SSMS
Solutions
  • Verify if the server is running on the Ubuntu machine by running the command:
    sudo systemctl status mssql-server
    If the server is not running, it can be started by running the command:
    sudo systemctl start mssql-server
    After which, running the previous command again should look something like this:
  • Verify that the firewall has allowed the port 1433 which SQL Server is using by default. First we need to check the status of the ufw, which is Ubuntu’s Uncomplicated Firewall, by running the following command and entering the password for the account:
    sudo ufw status
    • To allow a port through the ufw, run the following command:
      sudo ufw allow 1433
Problem
  • Cannot connect to the server using SA account
Solution
  • To reset the system administrator (SA) password, run the following commands:
    sudo systemctl stop mssql-server
    sudo /opt/mssql/bin/mssql-conf setup
    Take note that this will temporarily stop SQL Server mssql-server service.

Memunculkan Simbol & Emoji Pada OS Mac

  Memunculkan Simbol & Emoji  1. Buka aplikasi Pages / Notes pada Macbook. 2. Klik pada Menubar Edit --> Pilih Emoji and Symbols a...